分类 Python 下的文章

pgzero 配置环境

pgzero环境配置

  • 创建python虚拟环境

    python3 -m venv pgzero_venv

  • 激活python虚拟环境

    source pgzero_venv/bin/activate ## On Linux
    pgzero_venv/bin/activate.bat ## on Windows

  • 安装pgzero
 pip install pgzero
  • 运行pgzero程序

    pgzrun xxx.py ##在Windows平台默认pgzrun不在path环境变量里,需要设置一下,或者使用pgzrun全路径

OIP-C-Flask.jpeg

Flask网络应用 - 天气应用

Flask官方文档
使用Flask框架构建一个简单的天气网络应用,获取指定城市的天气信息

需要安装flask
pip install flask -i https://pypi.tuna.tsinghua.edu.cn/simple
openweathermap 免费的API服务,获取API_KEY
  • 新建一个目录比如weather_app
  • 在该目录下面再建一个子目录templates
  • 在目录weather_app下面新建文件weather_app.py,内容如下:

导入flask组件

from flask import Flask, render_template, request
import requests

app初始化


app = Flask(__name__)
API_KEY = '6a645a2f6bd3be51f5a30b36577a81'  ## 替换为你的 OpenWeatherMap API 密钥

@app.route('/')
def index():
    return render_template('index.html')

@app.route('/weather', methods=['POST'])
def weather():
    city = request.form['city']
    weather_data = get_weather_data(city)
    if weather_data:
        return render_template('weather.html', city=city, weather=weather_data)
    else:
        return render_template('error.html', message='无法获取天气信息')

def get_weather_data(city):
    url = f'http://api.openweathermap.org/data/2.5/weather?q={city}&appid={API_KEY}&units=metric&lang=zh_cn'
    response = requests.get(url)
    if response.status_code == 200:
        data = response.json()
        weather = {
            'description': data['weather'][0]['description'],
            'temperature': data['main']['temp'],
            'humidity': data['main']['humidity'],
            'wind_speed': data['wind']['speed'],
        }
        return weather
    else:
        return None

if __name__ == '__main__':
    app.run(debug=True)
  • 在目录templates下面新建三个html模板文件:index.html, weather.html, error.html

index.html:

<!DOCTYPE html>
<html>
<head>
    <title>天气应用</title>
</head>
<body>
    <h1>天气应用</h1>
    <form action="/weather" method="post">
        <label for="city">输入城市名:</label>
        <input type="text" id="city" name="city" required>
        <button type="submit">获取天气</button>
    </form>
</body>
</html>

weather.html:

<!DOCTYPE html>
<html>
<head>
    <title>{{ city }}的天气</title>
</head>
<body>
    <h1>{{ city }}的天气</h1>
    <p>天气描述:{{ weather.description }}</p>
    <p>温度:{{ weather.temperature }}°C</p>
    <p>湿度:{{ weather.humidity }}%</p>
    <p>风速:{{ weather.wind_speed }} m/s</p>
</body>
</html>

error.html:

<!DOCTYPE html>
<html>
<head>
    <title>错误</title>
</head>
<body>
    <h1>发生错误</h1>
    <p>{{ message }}</p>
</body>
</html>

网络爬虫初步

  • 透过requets获取网络数据
  • API

例子httpcat API使用

httpcat是个有趣的免费API,根据输入的http status code,返回一张cat图片

#https://httpcats.com/[http_status_code].jpg

import requests


# Set the URL of the image you want to download
url = "https://httpcats.com/404.jpg"

# Send a GET request to the URL and get the response
response = requests.get(url)

# Get the content of the response (i.e., the image data)
image_data = response.content

# Save the image to a file
with open("cat.jpg", "wb") as file:
    file.write(image_data)

# Open the image file
image = Image.open("cat.jpg")

# Display the image
image.show()

当客户端向服务器发送请求时,服务器会返回一个状态码来指示请求的处理结果。以下是一些常见的HTTP状态码的列表:

1xx(信息性状态码):这些状态码表示服务器已经收到了请求并正在继续处理它。例如:

100(继续):服务器已经收到了请求头部,客户端应该继续发送请求主体。
101(切换协议):服务器正在更改协议,例如从HTTP到WebSocket。
2xx(成功状态码):这些状态码表示服务器已经成功接收、理解和处理了请求。例如:

200(成功):请求已成功处理。 201(已创建):请求已成功处理,并创建了一个新的资源。
204(无内容):请求已成功处理,但没有内容返回。 3xx(重定向状态码):这些状态码表示客户端必须采取其他操作才能完成请求。例如:

301(永久移动):请求的资源已永久移动到一个新的URL。 302(临时移动):请求的资源已在不同的URL找到,但位置可能是临时的。
304(未修改):客户端缓存的资源副本仍然有效。 4xx(客户端错误状态码):这些状态码表示客户端在请求中出现了错误。例如:

400(错误请求):由于语法格式不正确,服务器无法理解请求。 401(未经授权):客户端必须进行身份验证才能获取所请求的响应。
403(禁止访问):客户端没有访问内容的权限。 5xx(服务器错误状态码):这些状态码表示服务器在处理请求时遇到了错误。例如:

500(服务器内部错误):服务器遇到了意外的条件,阻止它完成请求。 502(错误网关):服务器作为网关或代理时从上游服务器收到了无效的响应。
503(服务不可用):服务器当前由于临时超载或维护而无法处理请求。
拓展练习:
增加用户输入
根据输入获取对应的图片,用该输入命名图片文件,比如404.jpg, 101.jpg 等等

import requests
from PIL import Image


http_status_code = 101

http_status_code = input('Input 3 digits HTTP STATUS CODE(like 101, 404 etc):')

# Set the URL of the image you want to download
url = f"https://httpcats.com/{http_status_code}.jpg"

# Send a GET request to the URL and get the response
response = requests.get(url)

# Get the content of the response (i.e., the image data)
image_data = response.content

# Save the image to a file
with open(f"{http_status_code}.jpg", "wb") as file:
    file.write(image_data)

# Open the image file
image = Image.open(f"{http_status_code}.jpg")

# Display the image
image.show()
另外更高阶的话题,可以使用selenium实现网络访问自动化
使用selenium我实现了一个自动抓取网络数据的小工具

补充材料

Extra Topic 网络数据抓取

网络爬虫是一种自动化程序,用于从互联网上收集信息。它模仿人类在浏览器中浏览网页的行为,通过访问网站并提取感兴趣的数据。
使用Python编写网络爬虫非常方便,你可以使用Python中的一些库(例如Requests和Beautiful Soup)来帮助你完成这个任务。下面是一个简单的步骤指南,帮助你了解如何使用Python来从网站上提取数据:

1. 安装Python:首先,确保你的计算机上安装了Python编程语言。你可以从Python官方网站(https://www.python.org)上下载并安装最新版本的Python。
2. 安装所需的库:在Python中,有一些非常有用的库可以帮助你进行网络爬虫。其中两个常用的库是Requests和Beautiful Soup。你可以使用以下命令在终端或命令提示符中安装它们:


pip install requests
pip install beautifulsoup4

导入所需的库:在你的Python代码中,首先导入这些库,以便你可以使用它们的功能。例如:

import requests
from bs4 import BeautifulSoup

发起HTTP请求:使用Requests库,你可以发送HTTP请求以获取网页的内容。你可以使用以下代码发送一个简单的GET请求:

response = requests.get('https://www.example.com')

这将返回一个包含响应内容的对象。

1. 解析网页内容:使用Beautiful Soup库,你可以解析网页的内容,以便提取你感兴趣的数据。你可以使用以下代码创建一个Beautiful Soup对象,并使用其功能来解析网页:


soup = BeautifulSoup(response.content, 'html.parser')

提取数据:通过分析网页的HTML结构,你可以使用Beautiful Soup提供的方法来提取数据。你可以使用标签名称、CSS选择器、类名等等来定位和提取数据。以下是一个简单的示例:

假设网页中有一个
标签,类名为 "content"

div_element = soup.find('div', class_='content')

提取该
标签中的文本内容

content = div_element.text

这是一个简单的例子,你可以根据网页的结构和你的需求来提取更多的数据。
这是一个初步的介绍,帮助你了解网络爬虫的概念以及如何使用Python从网站上提取数据。当你进一步学习和实践时,你会发现还有很多关于网络爬虫的技术和策略可以探索。记住,在使用网络爬虫时要遵守网站的使用规则和法律法规,确保

  • 例子,抓取dazuicheng.com上博客文章

    import requests
    from bs4 import BeautifulSoup

    # 发起HTTP请求获取网页内容
    url = 'http://www.dazuicheng.com'
    #url = 'http://www.dazuicheng.com/index.php/page/2/' # 要抓取的网站地址, next page
    response = requests.get(url)

    # 解析网页内容
    soup = BeautifulSoup(response.content, 'html.parser')

    # 提取博客文章
    articles = soup.find_all('article')

    # 打印博客文章标题和内容
    for article in articles:

     title = article.find('h2').text.strip()
     content = article.find('div', class_='post-content').text.strip()
     print('标题:', title)
     print('内容:', content)
     print('---')
    

snake game using PyQt6

使用PyQt6构建一个snake game

from PyQt6.QtCore import Qt, QTimer
from PyQt6.QtGui import QColor, QPainter
from PyQt6.QtWidgets import QApplication, QMainWindow

CELL_SIZE = 30
GRID_SIZE = 20
SNAKE_INITIAL_LENGTH = 3
SNAKE_INITIAL_POSITION = (GRID_SIZE // 2, GRID_SIZE // 2)
SNAKE_INITIAL_DIRECTION = Qt.Key.Key_Right
FOOD_COLOR = QColor(0, 255, 0)  ## Green color

class SnakeGame(QMainWindow):
    def __init__(self):
        super().__init__()
        self.setWindowTitle("Snake Game")
        self.setFixedSize(CELL_SIZE * GRID_SIZE, CELL_SIZE * GRID_SIZE)
        
        self.snake = [(SNAKE_INITIAL_POSITION[0], SNAKE_INITIAL_POSITION[1] + i) for i in range(SNAKE_INITIAL_LENGTH)]
        self.direction = SNAKE_INITIAL_DIRECTION
        self.food = self.generate_food()

        self.timer = QTimer()
        self.timer.timeout.connect(self.move_snake)
        self.timer.start(200)  ## Snake movement speed
        
    def paintEvent(self, event):
        painter = QPainter(self)
        painter.setRenderHint(QPainter.RenderHint.Antialiasing)
        
        ## Draw snake
        for x, y in self.snake:
            painter.fillRect(x * CELL_SIZE, y * CELL_SIZE, CELL_SIZE, CELL_SIZE, Qt.GlobalColor.black)
        
        ## Draw food
        painter.fillRect(self.food[0] * CELL_SIZE, self.food[1] * CELL_SIZE, CELL_SIZE, CELL_SIZE, FOOD_COLOR)
    
    def keyPressEvent(self, event):
        if event.key() == Qt.Key.Key_Up:
            if self.direction != Qt.Key.Key_Down:
                self.direction = Qt.Key.Key_Up
        elif event.key() == Qt.Key.Key_Down:
            if self.direction != Qt.Key.Key_Up:
                self.direction = Qt.Key.Key_Down
        elif event.key() == Qt.Key.Key_Left:
            if self.direction != Qt.Key.Key_Right:
                self.direction = Qt.Key.Key_Left
        elif event.key() == Qt.Key.Key_Right:
            if self.direction != Qt.Key.Key_Left:
                self.direction = Qt.Key.Key_Right

    
    def move_snake(self):
        x, y = self.snake[0]
        
        if self.direction == Qt.Key.Key_Up:
            y -= 1
        elif self.direction == Qt.Key.Key_Down:
            y += 1
        elif self.direction == Qt.Key.Key_Left:
            x -= 1
        elif self.direction == Qt.Key.Key_Right:
            x += 1
        
        if not self.is_valid_move(x, y):
            self.timer.stop()
            return
        
        self.snake.insert(0, (x, y))
        
        if (x, y) == self.food:
            self.food = self.generate_food()
        else:
            self.snake.pop()
        
        self.update()
    
    def is_valid_move(self, x, y):
        if x < 0 or x >= GRID_SIZE or y < 0 or y >= GRID_SIZE:
            return False
        
        if (x, y) in self.snake[1:]:
            return False
        
        return True
    
    def generate_food(self):
        import random
        while True:
            x = random.randint(0, GRID_SIZE - 1)
            y = random.randint(0, GRID_SIZE - 1)
            if (x, y) not in self.snake:
                return x, y

if __name__ == '__main__':
    app = QApplication([])
    game = SnakeGame()
    game.show()
    app.exec()

代码注释

这是一个使用PyQt6库实现的贪吃蛇游戏的程序。下面是对程序的解释和注释:

from PyQt6.QtCore import Qt, QTimer
from PyQt6.QtGui import QColor, QPainter
from PyQt6.QtWidgets import QApplication, QMainWindow

导入了PyQt6库的核心模块Qt、定时器模块QTimer,图形模块QColor和QPainter,以及窗口模块QApplication和QMainWindow。

CELL_SIZE = 30
GRID_SIZE = 20
SNAKE_INITIAL_LENGTH = 3
SNAKE_INITIAL_POSITION = (GRID_SIZE // 2, GRID_SIZE // 2)
SNAKE_INITIAL_DIRECTION = Qt.Key.Key_Right
FOOD_COLOR = QColor(0, 255, 0)  ## 绿色
定义了一些常量,包括单元格大小CELL_SIZE,网格大小GRID_SIZE,蛇的初始长度SNAKE_INITIAL_LENGTH,蛇的初始位置SNAKE_INITIAL_POSITION,蛇的初始移动方向SNAKE_INITIAL_DIRECTION,以及食物的颜色FOOD_COLOR。

class SnakeGame(QMainWindow):
    def __init__(self):
        super().__init__()
        self.setWindowTitle("Snake Game")
        self.setFixedSize(CELL_SIZE * GRID_SIZE, CELL_SIZE * GRID_SIZE)
        
        self.snake = [(SNAKE_INITIAL_POSITION[0], SNAKE_INITIAL_POSITION[1] + i) for i in range(SNAKE_INITIAL_LENGTH)]
        self.direction = SNAKE_INITIAL_DIRECTION
        self.food = self.generate_food()

        self.timer = QTimer()
        self.timer.timeout.connect(self.move_snake)
        self.timer.start(200)  ## 蛇的移动速度
        
    def paintEvent(self, event):
        painter = QPainter(self)
        painter.setRenderHint(QPainter.RenderHint.Antialiasing)
        
        ##绘制蛇
        for x, y in self.snake:
            painter.fillRect(x * CELL_SIZE, y * CELL_SIZE, CELL_SIZE, CELL_SIZE, Qt.GlobalColor.black)
        
        ## 绘制食物
        painter.fillRect(self.food[0] * CELL_SIZE, self.food[1] * CELL_SIZE, CELL_SIZE, CELL_SIZE, FOOD_COLOR)

SnakeGame是一个继承自QMainWindow的类,表示整个游戏窗口。在初始化方法__init__中,设置了窗口标题和固定的窗口大小。初始化了蛇的初始位置、移动方向和食物,并创建了一个QTimer定时器,设置定时器的超时信号连接到move_snake方法上,并开始定时器。在paintEvent方法中,使用QPainter对象进行绘制,首先绘制蛇,然后绘制食物。

def keyPressEvent(self, event):
        if event.key() == Qt.Key.Key_Up:
            if self.direction != Qt.Key.Key_Down:
                self.direction = Qt.Key.Key_Up
        elif event.key() == Qt.Key.Key_Down:
            if self.direction != Qt.Key.Key_Up:
                self.direction = Qt.Key.Key_Down
        elif event.key() == Qt.Key.Key_Left:
            if self.direction != Qt.Key.Key_Right:
                self.direction = Qt.Key.Key_Left
        elif event.key() == Qt.Key.Key_Right:
            if self.direction != Qt.Key.Key_Left:
                self.direction = Qt.Key.Key_Right

在按键事件keyPressEvent中,根据按下的键盘按键修改蛇的移动方向。如果按下的是向上键并且当前方向不是向下,则将方向设为向上。类似地,如果按下的是向下、向左或向右键,并且当前方向不是相反方向,则更新蛇的移动方向。

def move_snake(self):
        x, y = self.snake[0]
        
        if self.direction == Qt.Key.Key_Up:
            y -= 1
        elif self.direction == Qt.Key.Key_Down:
            y += 1
        elif self.direction == Qt.Key.Key_Left:
            x -= 1
        elif self.direction == Qt.Key.Key_Right:
            x += 1
        
        if not self.is_valid_move(x, y):
            self.timer.stop()
            return
        
        self.snake.insert(0, (x, y))
        
        if (x, y) == self.food:
            self.food = self.generate_food()
        else:
            self.snake.pop()
        
        self.update()
move_snake方法用于更新蛇的位置。根据当前的移动方向,计算出蛇头的新坐标(x,
y)。然后检查新的坐标是否是有效的移动,如果无效,则停止定时器并返回。如果新坐标与食物的坐标相同,则表示蛇吃到了食物,将食物位置更新为新的随机位置,否则从蛇的尾部移除一个坐标。最后,调用update方法触发窗口的重绘。
def is_valid_move(self, x, y):
        if x < 0 or x >= GRID_SIZE or y < 0 or y >= GRID_SIZE:
            return False
        
        if (x, y) in self.snake[1:]:
            return False
        
        return True
is_valid_move方法用于检查给定的坐标是否是有效的蛇的移动。如果坐标超出了网格范围,或者坐标在蛇的身体中已经存在,则返回False,否则返回True。
def generate_food(self):
        import random
        while True:
            x = random.randint(0, GRID_SIZE - 1)
            y = random.randint(0, GRID_SIZE - 1)
            if (x, y) not in self.snake:
                return x, y

generate_food方法用于生成食物的随机位置。使用random模块生成一个随机的x和y坐标,并检查该坐标是否在蛇的身体中。如果不在,则返回该坐标作为食物的位置。

if __name__ == '__main__':
    app = QApplication([])
    game = SnakeGame()
    game.show()
    app.exec()

在主程序中,创建一个QApplication对象app和SnakeGame对象game,然后显示游戏窗口,并开始应用程序的事件循环,以使窗口能够接收和处理事件。

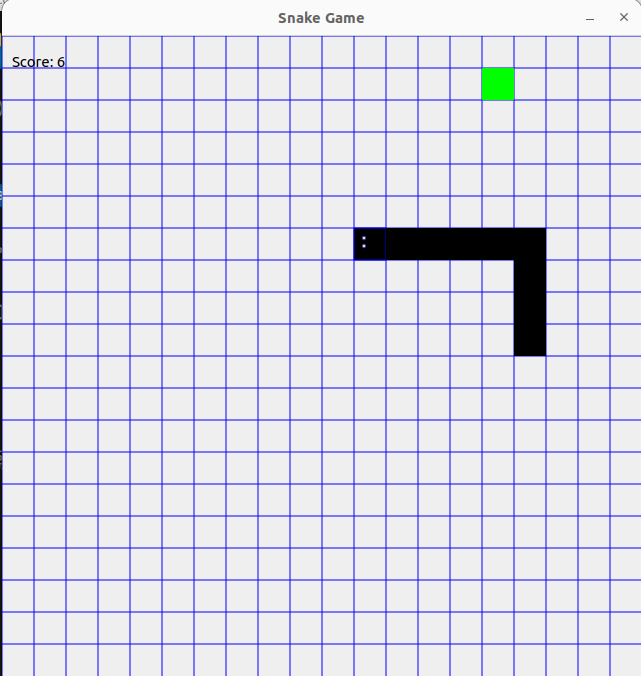
增加背景音乐,网格,计分

from PyQt6.QtCore import Qt, QTimer, QUrl
from PyQt6.QtGui import QColor, QPainter
from PyQt6.QtWidgets import QApplication, QMainWindow, QLabel
from PyQt6.QtMultimedia import QMediaPlayer, QAudio, QAudioOutput
from PyQt6.QtMultimedia import QSoundEffect


CELL_SIZE = 30
GRID_SIZE = 20
SNAKE_INITIAL_LENGTH = 3
SNAKE_INITIAL_POSITION = (GRID_SIZE // 2, GRID_SIZE // 2)
SNAKE_INITIAL_DIRECTION = Qt.Key.Key_Right
FOOD_COLOR = QColor(0, 255, 0)  ## Green color

class SnakeGame(QMainWindow):
    def __init__(self):
        super().__init__()
        self.setWindowTitle("Snake Game")
        self.setFixedSize(CELL_SIZE * GRID_SIZE, CELL_SIZE * GRID_SIZE)
        
        self.snake = [(SNAKE_INITIAL_POSITION[0], SNAKE_INITIAL_POSITION[1] + i) for i in range(SNAKE_INITIAL_LENGTH)]
        self.direction = SNAKE_INITIAL_DIRECTION
        self.food = self.generate_food()
        
        self.score = 0
        
        self.score_label = QLabel(self)
        self.score_label.setGeometry(10, 10, 100, 30)
        self.score_label.setText("Score: 0")

        self.timer = QTimer()
        self.timer.timeout.connect(self.move_snake)
        self.timer.start(200)  ## Snake movement speed


        self.filename = "bg_music.mp3"
        self.player = QMediaPlayer()
        self.audio_output = QAudioOutput()
        self.player.setAudioOutput(self.audio_output)
        self.player.setSource(QUrl.fromLocalFile(self.filename))
        self.audio_output.setVolume(50)
        
        ## 在音乐播放结束时重新开始播放
        self.player.mediaStatusChanged.connect(self.on_music_status_changed)
        
        ## 开始播放背景音乐
        self.player.play()
        
    def on_music_status_changed(self, status):
        if status == QMediaPlayer.MediaStatus.EndOfMedia:
            self.player.setPosition(0)  # 将音乐位置重置为0
            self.player.play()  # 重新播放背景音乐
    
    def paintEvent(self, event):
        painter = QPainter(self)
        painter.setRenderHint(QPainter.RenderHint.Antialiasing)
        
        ## 绘制网格
        painter.setPen(Qt.GlobalColor.blue)  # 设置线条颜色为蓝色
        for i in range(GRID_SIZE):
            painter.drawLine(0, i * CELL_SIZE, self.width(), i * CELL_SIZE)  ## 绘制水平线
            painter.drawLine(i * CELL_SIZE, 0, i * CELL_SIZE, self.height())  ## 绘制垂直线
        
        ## 绘制蛇
        for x, y in self.snake:
            painter.fillRect(x * CELL_SIZE, y * CELL_SIZE, CELL_SIZE, CELL_SIZE, Qt.GlobalColor.black)
        
        ## 绘制食物
        painter.fillRect(self.food[0] * CELL_SIZE, self.food[1] * CELL_SIZE, CELL_SIZE, CELL_SIZE, FOOD_COLOR)
    
    def keyPressEvent(self, event):
        if event.key() == Qt.Key.Key_Up:
            if self.direction != Qt.Key.Key_Down:
                self.direction = Qt.Key.Key_Up
        elif event.key() == Qt.Key.Key_Down:
            if self.direction != Qt.Key.Key_Up:
                self.direction = Qt.Key.Key_Down
        elif event.key() == Qt.Key.Key_Left:
            if self.direction != Qt.Key.Key_Right:
                self.direction = Qt.Key.Key_Left
        elif event.key() == Qt.Key.Key_Right:
            if self.direction != Qt.Key.Key_Left:
                self.direction = Qt.Key.Key_Right

    
    def move_snake(self):
        x, y = self.snake[0]
        
        if self.direction == Qt.Key.Key_Up:
            y -= 1
        elif self.direction == Qt.Key.Key_Down:
            y += 1
        elif self.direction == Qt.Key.Key_Left:
            x -= 1
        elif self.direction == Qt.Key.Key_Right:
            x += 1
        
        if not self.is_valid_move(x, y):
            self.timer.stop()
            return
        
        self.snake.insert(0, (x, y))
        
        if (x, y) == self.food:
            self.score += 1
            self.score_label.setText("Score: {}".format(self.score))
            self.food = self.generate_food()
        else:
            self.snake.pop()
        
        self.update()
    
    def is_valid_move(self, x, y):
        if x < 0 or x >= GRID_SIZE or y < 0 or y >= GRID_SIZE:
            return False
        
        if (x, y) in self.snake[1:]:
            return False
        
        return True
    
    def generate_food(self):
        import random
        while True:
            x = random.randint(0, GRID_SIZE - 1)
            y = random.randint(0, GRID_SIZE - 1)
            if (x, y) not in self.snake:
                return x, y

if __name__ == '__main__':
    app = QApplication([])
    app.setStyle("fusion")  # 使用Fusion样式,确保网格线条显示正常
    game = SnakeGame()
    game.show()
    app.exec()

PyQt6

GUI入门-PyQt6

介绍一下构建GUI(Graphic User Interface)图形用户界面应用
PyQt6 是一个用于创建桌面应用程序的 Python GUI 工具包。它是 PyQt 库的最新版本,提供了许多强大的功能和工具,用于开发功能丰富的图形用户界面。PyQt6 基于 Qt 库,Qt 是一个跨平台的应用程序开发框架,可以用于开发 Windows、macOS、Linux 等多个操作系统上的应用程序。
下面是一些 PyQT6 的入门介绍要点:

1. 安装 PyQt6:要开始使用 PyQt6,首先需要安装它。可以使用 pip 工具进行安装,运行以下命令:

pip install PyQt6
导入模块:在编写 PyQt6 应用程序之前,需要导入相关的模块。常用的模块包括 QtCore、QtGui 和 QtWidgets。可以使用以下方式导入模块:

from PyQt6.QtCore import Qt
from PyQt6.QtWidgets import QApplication, QMainWindow, QLabel, QPushButton, QVBoxLayout, QWidget

创建应用程序:在 PyQt6 中,需要创建一个应用程序对象。可以使用 QApplication 类来创建应用程序对象,如下所示:

app = Qapplication([])

创建主窗口:使用 QMainWindow 类可以创建一个主窗口。主窗口是应用程序的顶级窗口,可以包含其他小部件。例如:

window = QMainWindow()
window.setWindowTitle("My First PyQt6 Application")

添加小部件:使用各种小部件可以为主窗口添加功能。常见的小部件包括按钮、标签、文本框等。例如,要创建一个标签并将其添加到主窗口中,可以使用以下代码:

label = QLabel("Hello, PyQt6!", window)

布局管理器:PyQt6 提供了多种布局管理器,用于控制小部件在窗口中的位置和大小。布局管理器可以确保小部件根据窗口的大小和调整进行自动调整。常用的布局管理器有 QVBoxLayout 和 QHBoxLayout。例如,使用 QVBoxLayout 将标签和按钮垂直排列:

layout = QVBoxLayout()
layout.addWidget(label)
layout.addWidget(button)
window.setLayout(layout)

显示窗口:创建好主窗口和小部件后,需要将窗口显示出来。可以使用 show() 方法来显示窗口:

window.show()

运行应用程序:在完成所有设置后,需要运行应用程序的主循环。可以使用 exec() 方法来启动应用程序的主循环:

app.exec()

这些是 PyQT6 的一些基本概念和步骤,可以帮助你入门 PyQt6 开发。通过学习 PyQt6 文档和示例,你可以深入了解更多高级功能和用法。

put it all togetehr

from PyQt6.QtCore import Qt
from PyQt6.QtWidgets import QApplication, QMainWindow, QLabel, QPushButton, QVBoxLayout, QWidget

# 创建应用程序对象
app = QApplication([])

# 创建主窗口
window = QMainWindow()
window.setWindowTitle("My First PyQt6 Application")

# 清除默认布局
central_widget = QWidget()
window.setCentralWidget(central_widget)

# 创建标签和按钮
label = QLabel("Hello, PyQt6!", central_widget)
button = QPushButton("Click me!", central_widget)

# 创建布局管理器并添加小部件
layout = QVBoxLayout(central_widget)
layout.addWidget(label)
layout.addWidget(button)

# 按钮点击处理函数
def handle_button_click():
    label.setText("Button clicked!")

# 将按钮的 clicked 信号与处理函数关联
button.clicked.connect(handle_button_click)

# 显示窗口
window.show()

# 运行应用程序的主循环
app.exec()