标签 pygame 下的文章

OIP-C2.jpeg

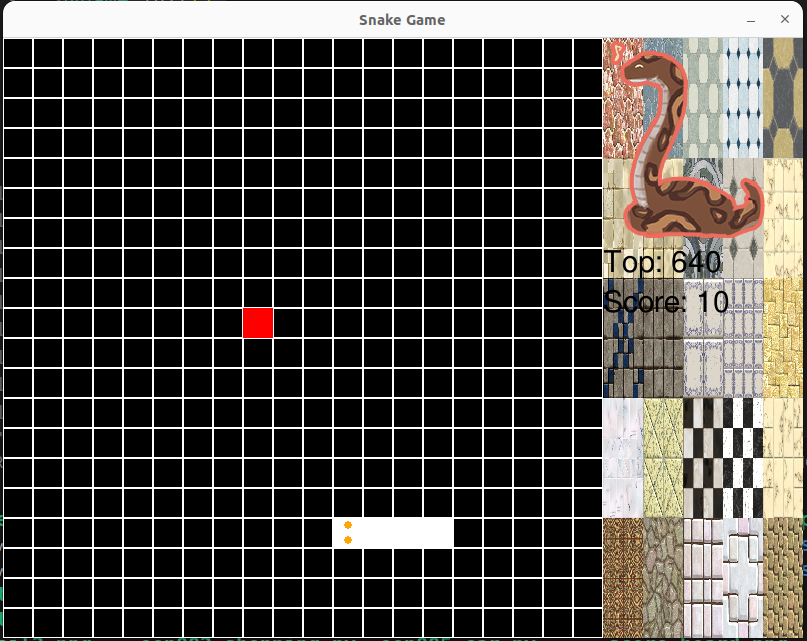
使用OOP面向对象改写snake game

涉及三个类:SnakeGame, Snake, Food
从高层抽象来看,程序如下:

my_game = SnakeGame()
my_game.play()

我们新建了一个游戏对象my_game,然后调用该对象的play()方法,运行游戏

所有的游戏逻辑封装在SnakeGame里面

# OOP snake game
import pygame
import random
class Snake:
    def __init__(self, screen, cols, rows, cell_size = 30, color=(0, 0, 0)):
        self.body = [(3, 0), (2, 0), (1, 0)]
        self.direction = "RIGHT"
        self.cell_size = cell_size
        self.screen = screen
        self.color = color
        self.cols = cols
        self.rows = rows

    def move(self, direction):
        head = self.body[0]
        if direction == "RIGHT":
            new_head = (head[0] + 1, head[1])
        elif direction == "LEFT":
            new_head = (head[0] - 1, head[1])
        elif direction == "UP":
            new_head = (head[0], head[1] - 1)
        elif direction == "DOWN":
            new_head = (head[0], head[1] + 1)
        self.body.insert(0, new_head)
        self.body.pop()
        self.direction = direction

    def draw(self):
        for cell in self.body:
            x = cell[0] * self.cell_size
            y = cell[1] * self.cell_size
            pygame.draw.rect(self.screen, self.color, [x, y, self.cell_size, self.cell_size])
        head = self.body[0]
        head_x = head[0] * self.cell_size
        head_y = head[1] * self.cell_size

        if self.direction == "LEFT" or self.direction == "RIGHT":
            eye1_pos = head_x + self.cell_size // 2, head_y + self.cell_size // 4
            eye2_pos = head_x + self.cell_size // 2, head_y + 3* self.cell_size // 4
        elif self.direction == "UP" or self.direction == "DOWN":
            eye1_pos = head_x + self.cell_size // 4, head_y + self.cell_size // 2
            eye2_pos = head_x + 3* self.cell_size // 4, head_y + self.cell_size // 2
        else:
            pass
        pygame.draw.circle(self.screen, (0, 0, 0), eye1_pos, 4)
        pygame.draw.circle(self.screen, (0, 0, 0), eye2_pos, 4)
        
    def check_collide(self, food):
        # Check if the Snake collides with the Food
        if self.body[0] == food.position:
            return 0
        # Check if the Snake collides with the wall
        if self.body[0][0] < 0 or self.body[0][0] >= self.cols or self.body[0][34] < 0 or self.body[0][35] >= self.rows:
            return 1
        # Check if the Snake collides with its own body
        for i in range(1, len(self.body)):
            if self.body[0] == self.body[i]:
                return 1
        return 2

    def grow(self):
        self.body.append(self.body[-1])


class Food:
    def __init__(self, screen, cols, rows, cell_size = 30, color=(255, 0, 0)):
        self.position = (random.randint(0, cols - 1), random.randint(0, rows - 1))
        self.color = color
        self.cell_size = cell_size
        self.cols = cols
        self.rows = rows
        self.screen = screen

    def generate_food(self, color=(255, 0, 0)):
        self.position = (random.randint(0, self.cols - 1), random.randint(0, self.rows - 1))
        self.color = color

    def draw(self):
        x = self.position[0] * self.cell_size
        y = self.position[1] * self.cell_size
        pygame.draw.rect(self.screen, self.color, [x, y, self.cell_size, self.cell_size])

   
class SnakeGame:
    # Define some colors
    BLACK = (0, 0, 0)
    WHITE = (255, 255, 255)
    GREEN = (0, 255, 0)
    RED = (255, 0, 0)
    # Set the dimensions of the screen
    SCREEN_WIDTH = 600
    SCREEN_HEIGHT = 600

    # Set the dimensions of the board and grid
    BOARD_ROWS = 20
    BOARD_COLS = 20
    GRID_SIZE = 30
    SCORE_BOARD_WIDTH = 200
    def __init__(self):

        # Initialize Pygame
        pygame.init()

        # Set the size of the screen
        self.screen = pygame.display.set_mode([SnakeGame.SCREEN_WIDTH + SnakeGame.SCORE_BOARD_WIDTH, SnakeGame.SCREEN_HEIGHT])
        self.snake = Snake(self.screen, SnakeGame.BOARD_COLS, SnakeGame.BOARD_COLS, SnakeGame.GRID_SIZE,SnakeGame.WHITE)
        self.food = Food(self.screen, SnakeGame.BOARD_COLS, SnakeGame.BOARD_COLS, SnakeGame.GRID_SIZE,SnakeGame.RED)
        self.score = 0

        # 创建字体对象
        self.score_font = pygame.font.SysFont('Arial', 30)
        self.score_text = 'Score'
        #font.render('Hello, world!', True, (255, 255, 255))

        # Set the caption of the screen
        pygame.display.set_caption("Snake Game")

    def draw(self):
        for row in range(SnakeGame.BOARD_ROWS):
            for col in range(SnakeGame.BOARD_COLS):
                x = col * SnakeGame.GRID_SIZE
                y = row * SnakeGame.GRID_SIZE
                pygame.draw.rect(self.screen, SnakeGame.WHITE, [x, y, SnakeGame.GRID_SIZE, SnakeGame.GRID_SIZE], 1)
    def draw_score(self):
        score_text = self.score_font.render(f'{self.score_text}: {self.score}', True, (255, 255, 255))
        self.screen.blit(score_text, (SnakeGame.SCREEN_WIDTH, 100))

    def play(self):
        # Set the clock for the game
        clock = pygame.time.Clock()
        done = False
        direction = "RIGHT"
        # Start the game loop
        while not done:
            # Handle events
            for event in pygame.event.get():
                if event.type == pygame.QUIT:
                    done = True
                elif event.type == pygame.KEYDOWN:
                    if event.key == pygame.K_RIGHT and direction != "LEFT":
                        direction = "RIGHT"
                    elif event.key == pygame.K_LEFT and direction != "RIGHT":
                        direction = "LEFT"
                    elif event.key == pygame.K_UP and direction != "DOWN":
                        direction = "UP"
                    elif event.key == pygame.K_DOWN and direction != "UP":
                        direction = "DOWN"
                    elif event.key == pygame.K_ESCAPE:
                        done = True
    
            # Move the Snake
            self.snake.move(direction)
            ret = self.snake.check_collide(self.food)
            #print(f'当前分数: {self.score}')
            if ret == 0: # collide with food
                self.food.generate_food()
                self.snake.grow()
                self.score +=10
            elif ret == 1: # hit wall or itself
                done = True
            else: # nothing happened
                pass

            # Clear the screen
            self.screen.fill(SnakeGame.BLACK)

            # Draw the board, Snake, and Food
            self.draw()
            self.snake.draw()
            self.food.draw()
            self.draw_score()

            # Update the screen
            pygame.display.flip()

            # Set the frame rate of the game
            clock.tick(5)

        pygame.quit()

my_game = SnakeGame()
my_game.play()

截图 2023-06-17 14-56-56.png

snake game(贪吃蛇)

分解snake game游戏,利用现有的知识构建完整的程序
变量
循环
贪吃蛇游戏的基本逻辑:蛇移动、碰撞处理、蛇身体增长

导入外部库

# 面向函数的编程范式,不涉及class,对象等
import pygame
import random

定义一些变量,保存游戏面板大小与颜色等

# 定义一些颜色变量
BLACK = (0, 0, 0)
WHITE = (255, 255, 255)
GREEN = (0, 255, 0)
BLUE  = (0, 0, 255)

# 游戏屏幕大小
SCREEN_WIDTH = 600
SCREEN_HEIGHT = 600

# 游戏面板行列,以及每个格子大小
BOARD_ROWS = 20
BOARD_COLS = 20
GRID_SIZE = 30

初始化pygame

# 初始化pygame,调用pygame方法之前必须初始化
pygame.init()

# 新建一个显示屏幕变量
screen = pygame.display.set_mode([SCREEN_WIDTH, SCREEN_HEIGHT])

# 设置窗口标题栏
pygame.display.set_caption("Snake Game")

定义snake和food变量

# 定义snake和food变量
snake = [(3, 0), (2, 0), (1, 0)]
direction = "RIGHT"
food_position = (random.randint(0, BOARD_COLS - 1), random.randint(0, BOARD_ROWS - 1))

定义函数 移动snake和生成food

# move_snake函数,以及生成food的函数
def move_snake():
    global snake
    head = snake[0]
    if direction == "RIGHT":
        new_head = (head[0] + 1, head[1])
    elif direction == "LEFT":
        new_head = (head[0] - 1, head[1])
    elif direction == "UP":
        new_head = (head[0], head[1] - 1)
    elif direction == "DOWN":
        new_head = (head[0], head[1] + 1)
    snake.insert(0, new_head)
    snake.pop()

def generate_food():
    global food_position
    food_position = (random.randint(0, BOARD_COLS - 1), random.randint(0, BOARD_ROWS - 1))

定义函数-绘制游戏面板,snake以及food

# Define the function for drawing the board
def draw_board():
    for row in range(BOARD_ROWS):
        for col in range(BOARD_COLS):
            x = col * GRID_SIZE
            y = row * GRID_SIZE
            pygame.draw.rect(screen, BLUE, [x, y, GRID_SIZE, GRID_SIZE], 1)

# Define the function for drawing the snake
def draw_snake():
    for cell in snake:
        x = cell[0] * GRID_SIZE
        y = cell[1] * GRID_SIZE
        pygame.draw.rect(screen, GREEN, [x, y, GRID_SIZE, GRID_SIZE])

# Define the function for drawing the food
def draw_food():
    x = food_position[0] * GRID_SIZE
    y = food_position[1] * GRID_SIZE
    pygame.draw.rect(screen, WHITE, [x, y, GRID_SIZE, GRID_SIZE])

定义游戏clock,决定了游戏刷新频率

# Set the clock for the game
clock = pygame.time.Clock()

游戏退出标志,True退出游戏

# Set the game loop flag
done = False

游戏的主循环,处理event,更新游戏状态:food,snake等,重新绘制food,snake,board等

# Start the game loop
while not done:
    # Handle events
    for event in pygame.event.get():
        if event.type == pygame.QUIT:
            done = True
        elif event.type == pygame.KEYDOWN:
            if event.key == pygame.K_RIGHT and direction != "LEFT":
                direction = "RIGHT"
            elif event.key == pygame.K_LEFT and direction != "RIGHT":
                direction = "LEFT"
            elif event.key == pygame.K_UP and direction != "DOWN":
                direction = "UP"
            elif event.key == pygame.K_DOWN and direction != "UP":
                direction = "DOWN"
            elif event.key == pygame.K_ESCAPE:
                done = True
    
    # Move the Snake
    move_snake()
    
    # Check if the Snake collides
    # Check if the Snake collides with the Food
    if snake[0] == food_position:
        generate_food()
        snake.append(snake[-1])

    # Check if the Snake collides with the wall
    if snake[0][0] < 0 or snake[0][0] >= BOARD_COLS or snake[0][31] < 0 or snake[0][32] >= BOARD_ROWS:
        done = True

    # Check if the Snake collides with its own body
    for i in range(1, len(snake)):
        if snake[0] == snake[i]:
            done = True

    # Clear the screen
    screen.fill(BLACK)

    # Draw the board, Snake, and Food
    draw_board()
    draw_snake()
    draw_food()

    # Update the screen
    pygame.display.flip()

    # Set the frame rate of the game
    clock.tick(5)

退出游戏,关闭pygame

pygame.quit()

R-C.gif

Pygame介绍

Pygame是一个用于开发2D游戏的Python库。它提供了一系列用于游戏开发的工具和函数,可以帮助开发者更快地构建游戏。Pygame具有跨平台性,可以在Windows、Mac OS X和Linux等多个平台上使用。

使用Pygame,开发者可以轻松地创建窗口、绘制图形、播放声音、响应用户输入等功能。它还提供了对位图、声音和视频等多媒体资源的处理功能。开发者可以使用Pygame创建各种类型的游戏,包括平台游戏、射击游戏、角色扮演游戏等等。

下面是一些Pygame的常用功能:

  • 创建和管理游戏窗口
  • 加载和显示图像
  • 绘制几何图形、文本和图像
  • 播放声音和音乐
  • 检测用户输入,如键盘和鼠标事件
  • 控制游戏速度和时间
  • 碰撞检测和物理引擎
  • 简单的人工智能

总之,Pygame是一个非常适合初学者学习游戏开发的Python库,使用Pygame可以让开发者轻松地入门游戏开发,从而更好地理解编程和计算机图形学的相关知识。

创建和管理游戏窗口

在Pygame中,要创建和管理游戏窗口,需要使用pygame.display模块。该模块提供了创建、显示、隐藏、更新游戏窗口等一系列操作。

下面是一个简单的例子,演示如何创建一个游戏窗口:

import pygame

## 初始化Pygame
pygame.init()

## 设置窗口大小和标题
screen_width, screen_height = 800, 600
screen = pygame.display.set_mode((screen_width, screen_height))
pygame.display.set_caption("My Game")

## 游戏循环
running = True
while running:
    ## 处理事件
    for event in pygame.event.get():
        if event.type == pygame.QUIT:
            running = False

    ## 填充屏幕背景
    screen.fill((255, 255, 255))

    ## 更新屏幕显示
    pygame.display.update()

## 退出Pygame
pygame.quit()

在这个例子中,我们首先导入了Pygame库,并使用pygame.init()初始化。接着,我们设置了游戏窗口的大小和标题,使用pygame.display.set_mode()函数创建了游戏窗口,并使用pygame.display.set_caption()函数设置了游戏窗口的标题。然后,我们进入游戏循环,不断处理事件、更新屏幕显示,直到用户关闭窗口为止。

在处理事件时,我们检查是否有pygame.QUIT事件发生,如果有,就将running变量设为False,从而退出游戏循环。

在更新屏幕显示时,我们首先使用screen.fill()函数填充了屏幕背景色为白色,然后使用pygame.display.update()函数更新屏幕显示。

需要注意的是,当游戏窗口被关闭时,我们需要使用pygame.quit()函数退出Pygame,释放所有资源。

这只是一个简单的例子,使用Pygame可以创建更复杂的游戏窗口,并实现更丰富的功能。

在 Pygame 中,pygame.display.flip() 和 pygame.display.update()
都可以用于更新屏幕显示,但它们之间有一些细微的区别。

pygame.display.flip() 用于实时更新屏幕显示,每次调用它都会完全重绘屏幕。在屏幕显示内容频繁变化时,可以使用
flip() 函数来保证显示的实时性。比如,在一个需要不断移动的游戏角色的场景中,可以使用 flip() 函数实现角色的平滑移动。

pygame.display.update()
用于部分更新屏幕显示。它可以只更新发生变化的部分,而不是完全重绘整个屏幕。这使得更新屏幕的速度更快,也更加高效。但需要注意的是,如果使用
update() 函数更新不包含所有像素的部分屏幕,则更新可能不完整,导致屏幕上显示的内容不正确。

总的来说,如果需要实时更新屏幕显示,使用 flip() 函数更为适合;如果只需要更新部分屏幕,则使用 update()
函数更为高效。在实际开发中,可以根据具体情况选择适合的函数。

加载和显示图像

在 Pygame 中,可以使用 pygame.image.load() 函数来加载图像,并使用 pygame.display.flip() 函数将其显示在屏幕上。

以下是一个简单的加载和显示图像的示例代码:

import pygame

## 初始化 Pygame
pygame.init()

## 创建窗口
screen = pygame.display.set_mode((400, 400))

## 加载图像
image = pygame.image.load('example.png')

## 显示图像
screen.blit(image, (0, 0))
pygame.display.flip()

## 进入游戏循环
while True:
    for event in pygame.event.get():
        if event.type == pygame.QUIT:
            pygame.quit()
            sys.exit()

在这个例子中,我们首先初始化了 Pygame,并创建了一个大小为 400x400 的窗口。然后使用 pygame.image.load() 函数加载了一个名为 example.png 的图像,并使用 screen.blit() 函数将其显示在屏幕上。最后调用 pygame.display.flip() 函数更新屏幕显示。

需要注意的是,上述示例代码只会显示一次图像,之后程序会进入游戏循环中。如果需要实现动态显示图像,需要在游戏循环中不断更新图像的位置和状态。

## 缩放图像
scaled_image = pygame.transform.scale(image, (100, 100))


绘制几何图形、文本和图

在 Pygame 中,可以使用 pygame.draw 模块绘制几何图形,使用 pygame.font 模块绘制文本,使用 pygame.image.load() 函数加载图像并使用 screen.blit() 函数绘制图像。

以下是一个简单的绘制几何图形、文本和图像的示例代码:

import pygame

## 初始化 Pygame
pygame.init()

## 创建窗口
screen = pygame.display.set_mode((400, 400))

## 绘制几何图形
pygame.draw.rect(screen, (255, 0, 0), pygame.Rect(10, 10, 50, 50))
pygame.draw.circle(screen, (0, 255, 0), (100, 100), 25)

## 绘制文本
font = pygame.font.Font(None, 36)
text = font.render('Hello, Pygame!', True, (255, 255, 255))
screen.blit(text, (200, 200))

## 加载图像并绘制
image = pygame.image.load('example.png')
screen.blit(image, (250, 50))

## 刷新屏幕
pygame.display.flip()

## 进入游戏循环
while True:
    for event in pygame.event.get():
        if event.type == pygame.QUIT:
            pygame.quit()
            sys.exit()

在这个例子中,我们首先使用 pygame.draw.rect() 函数绘制一个红色矩形和 pygame.draw.circle() 函数绘制一个绿色圆圈。然后使用 pygame.font.Font() 函数创建一个字体对象,并使用 font.render() 函数创建一个渲染好的文本对象。接着使用 pygame.image.load() 函数加载一个名为 example.png 的图像,并使用 screen.blit() 函数将其绘制到屏幕上。

最后,调用 pygame.display.flip() 函数刷新屏幕,并进入游戏循环中。在游戏循环中,处理 Pygame 的事件,例如点击关闭窗口等。

播放声音和音乐

在 Pygame 中,可以使用 pygame.mixer 模块播放声音和音乐。下面是一个简单的示例代码,演示如何播放一个声音和一首音乐:

import pygame

## 初始化 Pygame
pygame.init()

## 创建窗口
screen = pygame.display.set_mode((400, 400))

## 加载声音和音乐
sound = pygame.mixer.Sound('example_sound.wav')
music = pygame.mixer.music.load('example_music.mp3')

## 播放声音和音乐
sound.play()
pygame.mixer.music.play()

## 进入游戏循环
while True:
    for event in pygame.event.get():
        if event.type == pygame.QUIT:
            pygame.quit()
            sys.exit()

在这个例子中,我们首先使用 pygame.mixer.Sound() 函数加载一个名为 example_sound.wav 的声音文件,并使用 pygame.mixer.music.load() 函数加载一个名为 example_music.mp3 的音乐文件。

然后,使用 sound.play() 方法播放声音,并使用 pygame.mixer.music.play() 方法播放音乐。

最后,我们进入游戏循环中。在游戏循环中,处理 Pygame 的事件,例如点击关闭窗口等。

检测用户输入,如键盘和鼠标事件

在 Pygame 中,可以使用 pygame.event 模块来检测用户输入,包括键盘和鼠标事件。下面是一个简单的示例代码,演示如何检测用户按下 Esc 键并点击关闭窗口:

import pygame

## 初始化 Pygame
pygame.init()

## 创建窗口
screen = pygame.display.set_mode((400, 400))

## 进入游戏循环
while True:
    for event in pygame.event.get():
        if event.type == pygame.QUIT:
            pygame.quit()
            sys.exit()
        elif event.type == pygame.KEYDOWN and event.key == pygame.K_ESCAPE:
            pygame.quit()
            sys.exit()

在这个例子中,我们首先创建了一个名为 screen 的窗口。

然后,我们进入游戏循环中,使用 pygame.event.get() 函数获取 Pygame 的事件队列,并遍历所有事件。如果检测到 pygame.QUIT 事件,表示用户点击了窗口的关闭按钮,我们就使用 pygame.quit() 函数和 sys.exit() 函数退出程序。如果检测到 pygame.KEYDOWN 事件,并且按下的是 Esc 键,同样退出程序。

控制游戏速度和时间

在 Pygame 中,可以使用 pygame.time 模块来控制游戏速度和时间。下面是一些常用的函数:

pygame.time.Clock():创建一个 Clock 对象,用于跟踪游戏的帧率。
clock.tick(FPS):设置游戏的帧率,其中 FPS 是每秒帧数。
pygame.time.get_ticks():获取自 Pygame 初始化以来的毫秒数。
pygame.time.delay(ms):暂停游戏,单位为毫秒。

import pygame

## 初始化 Pygame
pygame.init()

## 创建窗口
screen = pygame.display.set_mode((400, 400))

## 创建 Clock 对象
clock = pygame.time.Clock()

## 获取程序开始运行的时间
start_time = pygame.time.get_ticks()

## 进入游戏循环
while True:
    # 设置游戏的帧率为 60
    clock.tick(60)

    ## 计算游戏运行的时间
    current_time = pygame.time.get_ticks() - start_time

    ## 暂停游戏 1 秒
    if current_time > 1000:
        pygame.time.delay(1000)

    ## 处理 Pygame 的事件
    for event in pygame.event.get():
        if event.type == pygame.QUIT:
            pygame.quit()
            sys.exit()

在这个例子中,我们首先创建了一个名为 screen 的窗口。

然后,我们创建了一个 Clock 对象,用于跟踪游戏的帧率。使用 clock.tick(60) 函数将游戏的帧率设置为 60,即每秒钟更新 60 次窗口。

接着,我们使用 pygame.time.get_ticks() 函数获取程序开始运行以来的毫秒数,并将其存储在变量 start_time 中。然后,我们在游戏循环中使用 pygame.time.get_ticks() 函数计算游戏运行的时间,并将其存储在变量 current_time 中。如果游戏运行的时间超过 1 秒,我们使用 pygame.time.delay(1000) 函数暂停游戏 1 秒。

最后,我们处理 Pygame 的事件,例如点击关闭窗口等。

碰撞检测和物理引擎

在 Pygame 中,可以使用碰撞检测来判断两个游戏对象是否相撞。通常使用 pygame.sprite.spritecollide() 函数进行碰撞检测,该函数可以检测一个 Sprite 对象是否与一个 Sprite 组中的任何一个对象相撞。如果相撞,该函数返回一个列表,包含与该对象相撞的所有 Sprite 对象。该函数的语法如下:

spritecollide(sprite, group, dokill, collided=None)

其中,参数说明如下:

  • sprite:要检测碰撞的 Sprite 对象。
  • group:包含其他 Sprite 对象的 Sprite 组。
  • dokill:是否从 Sprite 组中删除与 sprite 相撞的对象,默认值为 False。
  • collided:一个可调用对象,用于检测两个 Sprite 对象是否相撞。如果为 None,则默认使用
    sprite.rect.colliderect() 函数检测相撞。如果需要更复杂的碰撞检测,可以自定义该函数。

下面是一个简单的示例代码,演示如何使用碰撞检测来实现一个小游戏:

import pygame

## 初始化 Pygame
pygame.init()

## 创建窗口
screen = pygame.display.set_mode((400, 400))

## 加载图片
player_img = pygame.image.load('player.png').convert_alpha()
player_rect = player_img.get_rect()
player_rect.center = (200, 200)

enemy_img = pygame.image.load('enemy.png').convert_alpha()
enemy_rect = enemy_img.get_rect()
enemy_rect.center = (100, 100)

## 进入游戏循环
while True:
    ## 处理 Pygame 的事件
    for event in pygame.event.get():
        if event.type == pygame.QUIT:
            pygame.quit()
            sys.exit()

    ## 移动玩家
    keys = pygame.key.get_pressed()
    if keys[pygame.K_LEFT]:
        player_rect.x -= 5
    elif keys[pygame.K_RIGHT]:
        player_rect.x += 5
    elif keys[pygame.K_UP]:
        player_rect.y -= 5
    elif keys[pygame.K_DOWN]:
        player_rect.y += 5

    ## 检测碰撞
    ##if pygame.sprite.spritecollide(player_rect, [enemy_rect], True):
     if player_rect.colliderect(enemy_rect):  
        print('Game over!')

    ## 渲染游戏场景
    screen.fill((255, 255, 255))
    screen.blit(player_img, player_rect)
    screen.blit(enemy_img, enemy_rect)
    pygame.display.flip()

在这个例子中,我们首先加载了两张图片:player.png 和 enemy.png。然后,我们创建了两个包含图片和位置信息的 Rect 对象:player_rect 和 enemy_rect。

接着,我们进入游戏循环,处理 Pygame 的事件。如果用户按下方向键,我们就移动 player_rect 对象。然后,我们使用 pygame.sprite.spritecollide() 函数检测 player_rect 是否与 enemy_rect 相撞。如果相撞,我们将游戏结束。

最后,我们在游戏窗口中将所有的元素绘制出来,形成最终的游戏画面。这个过程一般称为渲染。在 Pygame 中,我们可以使用 pygame.display.flip() 或者 pygame.display.update() 来完成渲染的过程。

其中,pygame.display.flip() 是将我们所有的绘制操作都在内存中完成之后,一次性将整个画面渲染出来。而 pygame.display.update() 则是只渲染我们指定的区域,可以更加高效地更新画面。

除了渲染之外,我们还需要控制游戏的帧率和时间。在 Pygame 中,可以使用 pygame.time.Clock() 来创建一个时钟对象,并使用 clock.tick(fps) 来控制帧率。这样可以保证我们的游戏在不同的设备上都能够以相同的帧率运行,从而提供更好的游戏体验。

同时,我们还可以使用 pygame.time.get_ticks() 来获取当前游戏运行的时间,以便在游戏中实现一些时间相关的功能。

简单的人工智能

在 Python 中实现简单的人工智能,通常需要以下步骤:

  1. 定义问题空间:首先需要明确你的人工智能要解决的问题是什么,例如游戏中的敌人如何决策、聊天机器人如何回答问题等。
  2. 设计算法模型:针对不同的问题,需要设计不同的算法模型。例如,决策问题可以使用基于规则的算法、基于搜索的算法或基于强化学习的算法等。
  3. 收集和处理数据:对于需要训练的算法,需要收集和处理数据,例如分类问题需要一些已经被标记的数据集。
    实现代码并训练模型:在明确问题空间、设计算法模型、收集和处理数据之后,可以开始编写代码并训练模型。
  4. 评估和调整:训练完成后,需要对模型进行评估和调整,以提高其性能和准确率。

需要注意的是,实现简单的人工智能并不是一件简单的事情,需要深入学习相关的算法和编程知识。但是,如果你对人工智能感兴趣,可以开始从一些简单的问题开始尝试。例如,你可以使用 Python 实现一个基于规则的聊天机器人,让它能够回答一些基础的问题。

基于规则的聊天机器人sample:

import random

def get_response(message):
    greetings = ['hi', 'hello', 'hey', 'how are you']
    responses = {
        'hi': 'Hello there!',
        'hello': 'Hi!',
        'hey': 'Hey there!',
        'how are you': 'I am doing well, thank you. How about you?',
        'default': 'I am sorry, but I did not understand what you said.'
    }
    
    if message.lower() in greetings:
        return random.choice(responses[message.lower()])
    else:
        return responses['default']

while True:
    message = input('You: ')
    response = get_response(message)
    print('Bot:', response)

其他例子:

import pygame
import random

## 初始化pygame
pygame.init()

## 设置窗口大小和标题
screen_width, screen_height = 800, 600
screen = pygame.display.set_mode((screen_width, screen_height))
pygame.display.set_caption("Bouncing Ball")

## 定义小球的初始位置、半径、速度和颜色
ball_x, ball_y = random.randint(0, screen_width), random.randint(0, screen_height)
ball_radius = 20
ball_dx, ball_dy = random.randint(5, 10), random.randint(5, 10)
ball_color = (random.randint(0, 255), random.randint(0, 255), random.randint(0, 255))

## 设置游戏循环
clock = pygame.time.Clock()  # 创建一个Clock对象
FPS = 60  # 设置帧率为60帧/秒
running = True
while running:
    ## 处理事件
    for event in pygame.event.get():
        if event.type == pygame.QUIT:
            running = False
        elif event.type == pygame.KEYDOWN and event.key == pygame.K_ESCAPE:
            running = False
    
    ## 计算小球的下一步位置
    ball_x += ball_dx
    ball_y += ball_dy
    
    ## 碰到窗口边界时反弹并改变小球颜色
    if ball_x + ball_radius >= screen_width or ball_x - ball_radius <= 0:
        ball_dx = -ball_dx
        ball_color = (random.randint(0, 255), random.randint(0, 255), random.randint(0, 255))
    if ball_y + ball_radius >= screen_height or ball_y - ball_radius <= 0:
        ball_dy = -ball_dy
        ball_color = (random.randint(0, 255), random.randint(0, 255), random.randint(0, 255))
    
    ## 填充背景色
    screen.fill((255, 255, 255))
    
    ## 绘制小球
    pygame.draw.circle(screen, ball_color, (ball_x, ball_y), ball_radius)
    
    ## 更新屏幕
    pygame.display.update()
    
    ## 控制帧率
    clock.tick(FPS)

## 退出pygame
pygame.quit()